Breathtaking Tibet: How to take great photographs in winter
All images and text, unless stated otherwise, by Ken Koh, Art Director, HWM.
My love for the mountains and its people was what drew me to photography. Just before the end of 2015, I spent two weeks in Tibet, shooting in the freezing winter. Most days, the temperature dropped below zero, but some of the best photographs happen when it’s miserably cold outside.
So how do you take great photographs in winter, when harsh weather is part of the process?
What gear do you bring when weather is harsh?
Camera
I brought the Canon 5DS with me to Tibet. DSLR cameras perform better in winter, with their bigger batteries giving you longer battery life. The 5DS’ battery life is impressive, and easily lasted two days of shooting before I needed to recharge it.
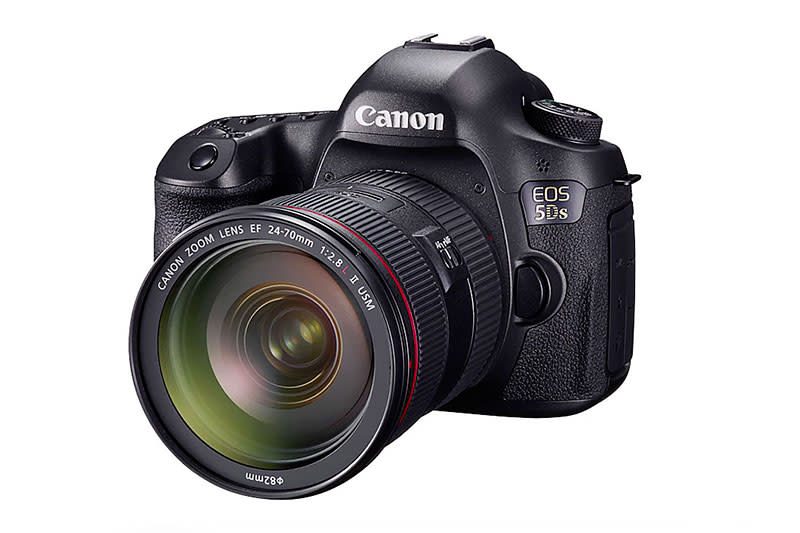
The 5DS provides amazing image quality, with its high-resolution 50.6MP full-frame sensor. Images are full of detail straight out of the camera. Its higher-resolution sensor does make shooting technique crucial, as any slight vibration or slower shutter speed may result in blurry details.
Besides the Canon 5DS, I also brought a smaller camera for the occasional street shot, the Fujifilm X100T. The downside of these smaller, mirrorless cameras is that their battery lives are usually shorter than DSLR cameras’, which is a problem in cold weather where batteries will drain faster.
ProTip: Head out with a fresh battery in your camera, and keep a spare one under your layers of clothing. You’re warmer than your camera bag, and this helps the spare battery to last longer.
Camera bag
On long trips with a lot of walking, I don’t like to use bags that look like camera bags, as it’s a big signal that I’m carrying expensive gear. On this trip, I used an F-Stop bag, which is a camera bag that actually looks like a hiking bag. Not only does it look good, I also found it functional and comfortable.
Tripod
A sturdy tripod is one of the most important tools for a landscape photographer. I use a Sirui carbon fiber tripod for its lightness (1.1kg) and the fact that it can be closed to a compact height of 41cm. I prefer three-section tripods, as they’re more stable compared to four or five-section tripods. Not only is carbon fiber lighter, carbon also absorbs vibration better than aluminum.
Filters
There are three filters I carry, a polarizing filter, a neutral density filter and a graduated density filter.
A polarizing filter is a must-have tool for landscape photography. It helps to add contrast and reduce reflections from objects like water and glass, plus it can be used to darken the sky.
Neutral density filters are used to cut down the amount of light reaching your sensor, letting you shoot with longer shutter speeds for effects like smooth running water.
Graduated neutral density filters are used in situations where the sky is much brighter than the rest of your landscape. These filters are clear on one side and slightly opaque on the other side, with either an abrupt or a gradual shift in the middle.
Most graduated neutral density filters are rectangular, and made to be used with a filter holder. I use Lee’s 100mm holder system, and it works well on both full-frame and cropped-sensor cameras.

What should you wear to stay warm?
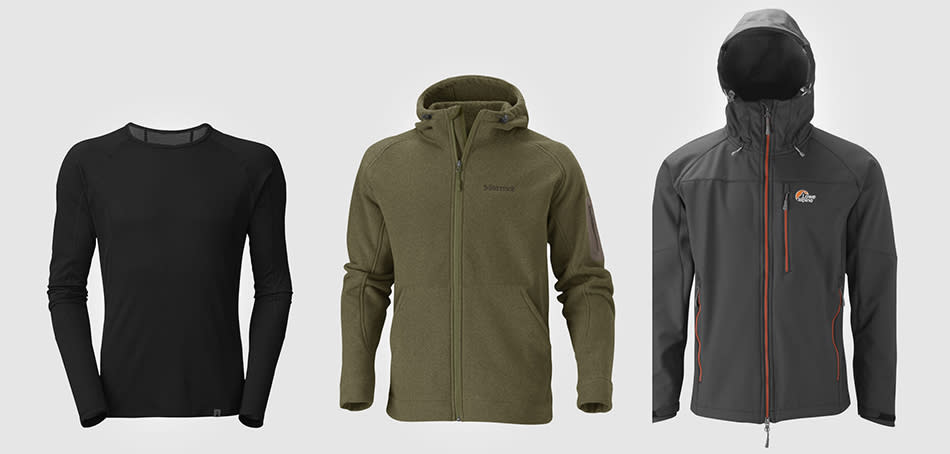
You don’t want to miss a great shot because you’re too cold to continue staying outdoors. Proper layering is a must when shooting in winter, and I stay warm by layering.
Base layer
This is the layer that’s right next to your skin. It helps regulate your body temperature by moving perspiration away from your skin. Look for base layers made of merino wool, polyester or silk.
Insulation layer
Natural fibers such as wool or polyester fleece are excellent insulators. They help you to retain heat by trapping air close to your body.
Shell or outer layer
The shell layer protects you from wind, rain and snow. Look for waterproof and breathable shells, and get one large enough to fit over the lower layers without restricting your movement.
Headgear and gloves
Cover your head because that’s where the body loses a lot of heat. Gloves are especially important for photographers; because they have to keep your hands warm while letting you change your camera settings with ease.
I like to wear a windproof glove liner, and a fingerless leather glove from Black Diamond on top of that.
Socks
A good pair of socks will let you go the extra mile. Most winter/trekking socks are made of wool plus synthetic materials. Wool keeps your feet warm, while synthetic materials give durability and moisture-wicking properties to the socks.
How to get great shots in winter
Get the correct exposure
Winter brings snow, and when you shoot a landscape with snow, your camera will almost always underexpose because of the large expense of white in the image. If your images turn out looking too dark, compensate with a +1 to +3EV setting on your camera.
Get the right white balance
Snow looks blue to your camera sensor, resulting in a blue overcast. To remove the blue overcast, set the camera’s white balance to ‘Shade’ or shoot in raw. Instead of having the white balance baked into the JPEG at the time of shooting, raw files let you change your white balance setting later in Photoshop.

Look for contrast, patterns and textures
A good winter landscape photo often features a strong contrast between the white snow and dark areas of the photo. You don’t want a snow-filled photo where everything in the scene is either too white or washed-out (pure white areas where there’s no detail).
Look for dark elements that contrast with the whiteness of the snow, such as land surface not covered by snow. Look for interesting patterns or textures, like overlaying tree branches, or a frozen river surface.
When the exposure is mismatched
Let’s say you an interesting composition, but the sky is just too bright and you either get an over-exposed sky with a correctly exposed landscape (01), or a correctly exposed sky with an under-exposed landscape (02). Here’s how filters solve this problem. In this scenario, I usually use a 2-3 stop graduated neutral density filter to darken the sky, so that the overall exposure will be more even (03).
Filters are available in a number of strengths, usually expressed in ‘stops.’ One stop is a halving of the light coming through the opaque part of the filter. So a one-stop filter will darken the bright area by a factor of two, a two-stop filter by a factor of four, and a three-stop filter by a factor of eight. You can see filters sold in values of 0.3, 0.45, 0.6, 0.75, and 0.9, which correspond to 0.3/1 f-stop of light, 0.45/1.5 f-stops, 0.6/2 f-stops, 0.75/2.5 f-stops, and 0.9 to 3 f-stops.

What to do after a winter shoot
Protect your gear from condensation
Carry a zip-lock bag with you, and when you’re ready to go back into your warm hotel room, place your camera into the zip-lock bag and seal it tight. This lets your camera slowly warm up to room temperature, protecting it from condensation on the lens and body.
Back up your files
Always back up your photos onto a laptop or portable hard disk after your shoot. There are rugged portable hard drives that are made to survive impact, and even some light rain, which is very useful when you’re moving around a lot and want to protect your data.
Reward yourself!
After braving the cold to get the perfect shot, it’s time to reward yourself with a hot cup of coffee or tea.
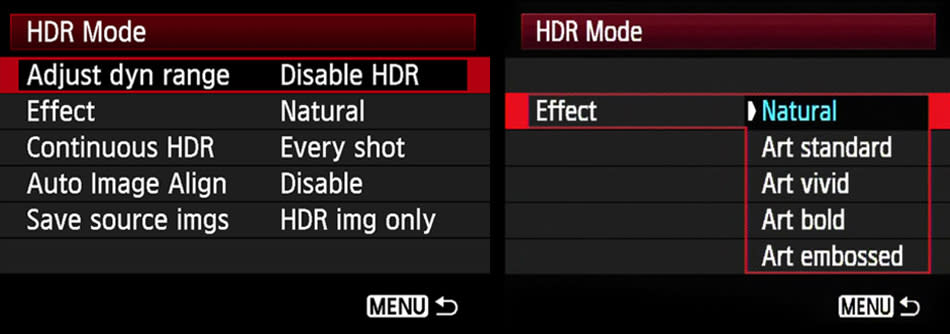
ProTip: How to take HDR photos using the Canon 5DS

One way to get the most details out of a landscape is to use the High Dynamic Range technique, commonly known as HDR. Canon’s HDR shooting mode in the 5DS works quite well to do this, here’s how:
Click on the ‘Creative Photo’ button on the back of the camera, and turn the dial to select ‘HDR Mode.’
Set your desired dynamic range. I usually set +1EV. You can choose from five different HDR effects; Natural, Art Standard, Art Vivid, Art Bold and Art Embossed.
Enable ‘auto image align.’
Using the 5DS’ HDR shooting mode produces a JPEG as the final HDR image. If you want to save in raw, you’ll have to use the bracketing method, with Auto Exposure Bracketing. You can then use HDR software, like Photomatix, Adobe Photoshop or Nik’s HDR Efex Pro, to combine three or more images together to create a HDR image.

Look at the light
Whether you shoot in winter, spring, summer or autumn, the best tool available to photographers is still natural light, and it’s free. My last tip for you is to train yourself to become more observant of light, no matter where or which season you’re in.
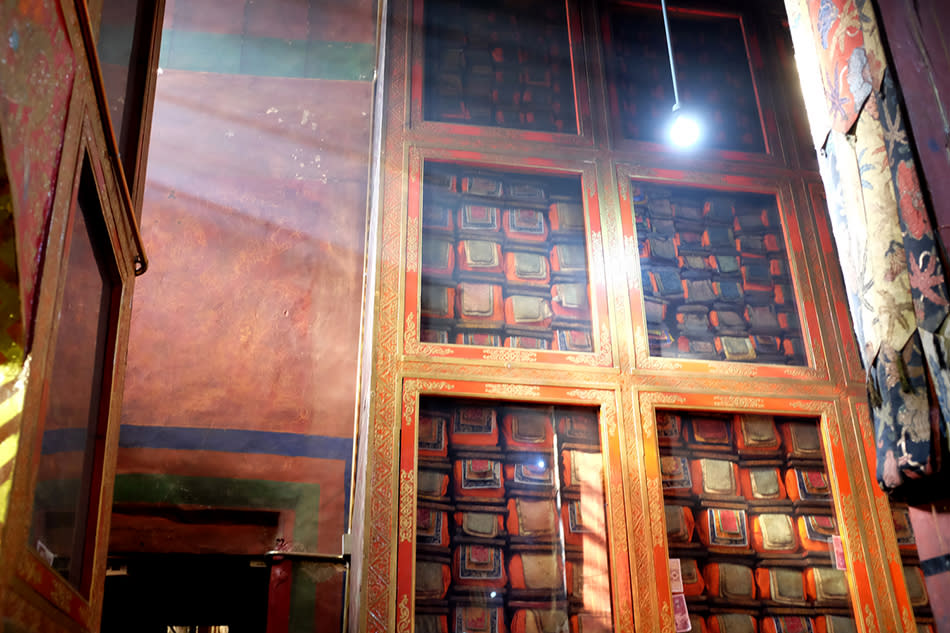
In the shot below, I was wandering inside this monastery for hours, appreciating the murals and statues, but it was just too dark for a good photograph. When I entered this room, I saw a light shining in from one of the ceiling windows, adding mood and depth to the scene.
Observe how light changes when you move from place to place, how it casts shadows, train your eyes to recognize different light sources, and how it impacts your photograph. I hope you’ve found this feature helpful. Drop me a note on Instagram if you have any questions!
— Ken Koh, Art Director, HWM