
How To Build Your Own Workshop Sawhorse


POP Projects is a collection of new and classic projects from more than a century of Popular Mechanics. Master skills, get tool recommendations, and, most importantly, build something of your very own.
When I was a kid, carpenters built their toolboxes and a lot of their day-to-day work aids. I admit, it’s hard to beat the store-bought tool bags and parts organizers in wide use today. Wear-resistant fabrics, plastics, and extruded aluminum are all strong and lightweight. Score one for industrial designers.
On the other hand, when you make your own boxes, bins, jigs, and sawhorses, you get exactly what you want, not somebody else’s idea of efficiency. I built a pair of these light-duty sawhorses to fit in the trunk of my ancient Chevy Malibu to assist me as I take my act on the road. You can pick up each with one hand. The I-beam top gives them strength and rigidity while helping them withstand the occasional nick from a saw.
The Tools You'll Need
Let's Start Building
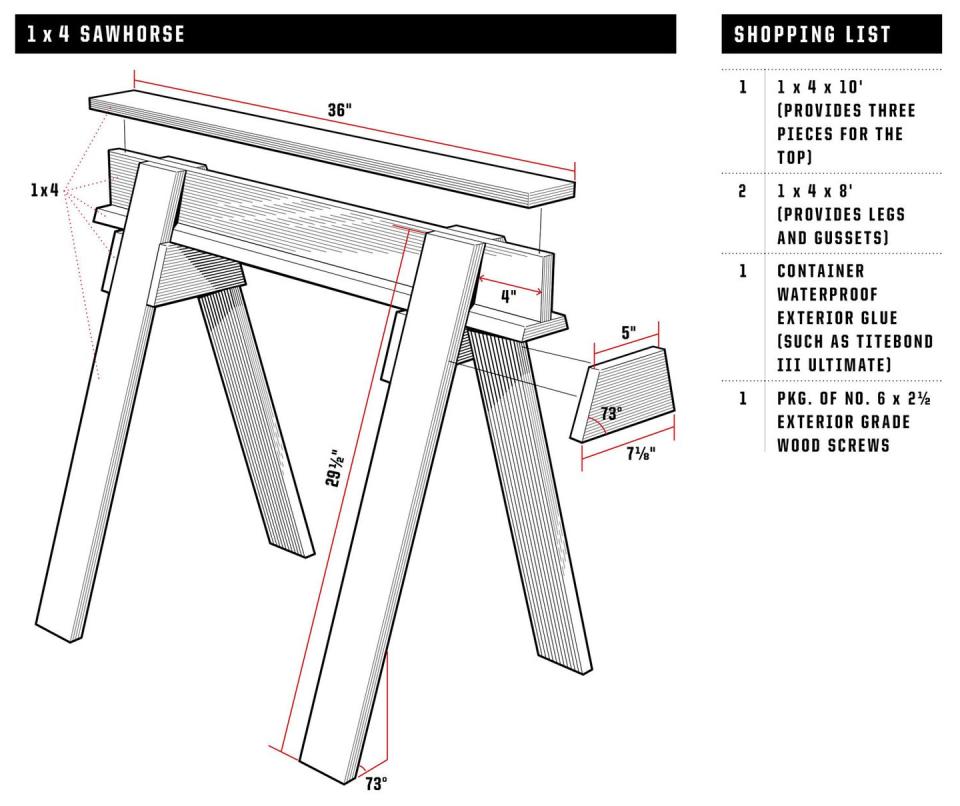
Crosscut the three 1 x 4s for the top. Tilt the table-saw blade to 73 degrees, and run one 1 x 4 along a 50-tooth ATBR blade to put the bevel on each edge.
⚠️ You reduce the width of the 1 x 4 slightly. You want to shave the bevel on it.
Leave the saw blade at 73 degrees and crosscut the legs to length using a miter gauge. Begin making the top subassembly by drawing lines that mark where the horizontal pieces of the I-beam will attach to the vertical piece. Use a sharp pencil and draw a line down both the top and bottom surfaces of both horizontal pieces, the length of each piece, 1 3/8 inch in from each edge. The lines on the inside surface help you position the horizontal and vertical parts. The lines on the outer surfaces (the top and bottom of your beam) tell you where to drill pilot holes for the finish nails so that the nails hit the vertical piece.
Align and clamp together the horizontal and vertical members of the I-beam, using the pencil lines to guide you, and make four 1/16-inch-diameter pilot holes through the top horizontal piece into the vertical piece. Flip the assembly over and repeat on the opposite side. Make a tick mark on the end of the assembly, spanning all three pieces, to be sure that when you glue and nail the parts together the pilot holes stay aligned. Unclamp everything.
Nail the top together. First, spread a small bead of waterproof wood glue such as Titebond III Ultimate on the top edge of the vertical part of the I-beam. Don’t overdo it. The more glue you spread the more slippery things get. Check your tick marks, then start an 8d finish nail in one of the pilot holes; bring the I-beam parts into alignment and partially tap in the finish nail. Check the opposite end for alignment and partially tap in a finish nail there. Double-check alignment, drive the two nails home, and finish with the center nails. Repeat on the opposite surface to complete the I-beam.
Fasten the legs to the sawhorse by marking 4 inches in from the ends of the I-beam. Fasten the legs to the I-beam with glue and No. 6 x 2 ½-inch wood screws. Mark and cut the two gussets on a miter saw. Attach each gusset to the legs with glue and No. 6 x 2 ½- inch wood screws.
Gently round sharp corners with a sanding block, including the bottom of the legs, which see the most abuse. Congrats, you're done. Now...let's build something else.

You Might Also Like
